Showing posts with label DIY projects. Show all posts

Thursday, November 18, 2010

sneak peek

0 comments
The kitchen has waved farewell to its demolition phase and reconstruction is underway. Here's a sneak peek. Enjoy!

Thursday, November 4, 2010

Help!

3 comments

Before I begin, sorry for the poor quality of this photo... iPhone. :)

OK. So I need your opinion. Based on all of the "potential move" of kitchen appliances I shared with you in my previous post, a few nights ago we were inspired I was inspired (so Rob was pretty much forced to help) to start demo-ing our kitchen. I like to call it test-demo. We took the countertop off of the small cabinet next to the stove in the photo above. Easy as pie. It was only held on with L-brackets and screws. I also peeled off the plastic toe-kick on the bottom of that cabinet, because that will eventually go before we repaint the cabinets. See the teal? That's what color the cabinets ORIGINALLY were before the cream color they are currently. Then we tried moving the stove over to the corner because the upper cabinet is higher and more equally proportioned to the dimensions of modern day stoves/ovens. We plan to purchase a new one. You can see why. (PS - don't look to closely at the dirt that was where the stove used to me or your gag reflex might kick in if you are anything like me). You can also see what the wall looks like underneath the laminate backsplash. Dark brown glue goop that is impossible to remove.

Oh, did I mention we're having house guests next weekend?

I guess we'll be eating out. I hope they don't mind.

So... we can't decide about the stove. Corner or back in the original location? HELP!

Tuesday, November 2, 2010

A Fresh Start

1 comments
This weekend, we were able to find the time to FINALLY start a bunch of projects that we have been meaning to start for months. I am so glad that they are underway, and can't wait to share the progress with you as they go. First up is our kitchen. It looks like we've either just moved in, or are getting ready to move out. The displaced kitchen items have found homes in the living room (where we're currently testing out a conjoined dining room/living room to see how we feel about it), basement, and even office/guest room. I'm an "a place for everything and everything in its place" kind of gal, and so we'll see how long it takes before the chaos gets to me. But so far it's been 2.5 days, and I am holding up okay. Check back on me in a week.
Above are a few shots of the displacement, and below, the dining room/living room conjoinment... What do you think?
Anyway, we knew that in order to get actually started on the project and not just thinking about starting, we would have to empty out the room so that we could again see what we were working with. We'd have to do this to start, and although we're still trying to figure a few things out first, we feel like we've started and clearly can't go on living like this forever. 

Our plans for the kitchen "renovations" have changed about 17 times, and we are still undecided about just how we want to work the layout. We have solid wood cabinets, which we've talked about replacing, but the truth is that right now, we think we'd regret tearing them all out (both sentimentally and budget-wise). Our plans are to sand them down, patch up the holes, and paint them a coat of crisp, clean white. We're deciding whether or not to move the stove from the middle to the corner of one wall, to remedy the "original stove was larger than current 30" stove and vent" problem with the cabinet above, as you can see in the following shots.
We've also got to figure out how to remove the laminate backsplash that is currently the same as the laminate countertops without damaging the countertops in case we don't redo the counters and sink right away. We know we want to tile the backsplash with subway tile close together and gray grout... it's just a matter of doing things in the right order, which currently we're thinking is: 1) remove old backsplash; 2) paint cabinets; 3) tile.

Our second big project is working on the outside. We have beds the whole way around our rancher, and a few large trees, so lately we've been tree pruning like crazy and this weekend, we cut down all of the flowers in the back beds in preparation for some major work this spring with the rototiller. We have some regrading to do (still working on our inspection checklist) and plan on installing new walkways to the front and back leading to a new stone or brick patio outside of our screened-in porch.  We also have a decent amount of leaves, and filled up 9 compost bags full of leaves and the clippings from our back beds. 
Last weekend, Rob (with the help of our uncle who was visiting from Boston for the weekend) built this ramp into the shed so that we can easily store our tractor and lawnmower in there. It looks great and is SO functional!
With the leftover board from the ramp project last weekend, this weekend we installed a swing from the huge oak tree in our front yard. It adds a little charm, and is fun too!

So, that was our weekend. Have you started any projects lately?

Tuesday, September 28, 2010

Saturday's Project

2 comments
It's been WAY too long since my last post. Things have been busy, and we've been enjoying the last of summer and settling back into our "school year" routine. We've been working on a lot lately, but unfortunately my follow-through hasn't been good enough to get things up here... my apologies.

This weekend, we tackled the headboard project for our bed. Just before we got married, we purchased a new queen-size bed so that we'd have something to rest our heads on. Two twins pushed together just wouldn't cut it. :) If you've been reading for a while, you know that Rob's grandmother passed away just days after the wedding, and we spent much of the following year helping sort through things to get her house ready to sell. Then once it sold, we helped move everything out, and inherited some of the furniture, including the bedroom set (large dresser and chest of drawers with two matching nightstands and a king-size bed with a brass headboard). The bed was almost brand new, and actually fits in our bedroom with plenty of room to spare, so we moved our queen into the guest room and have been sleeping on a headboardless king bed for the past few months.

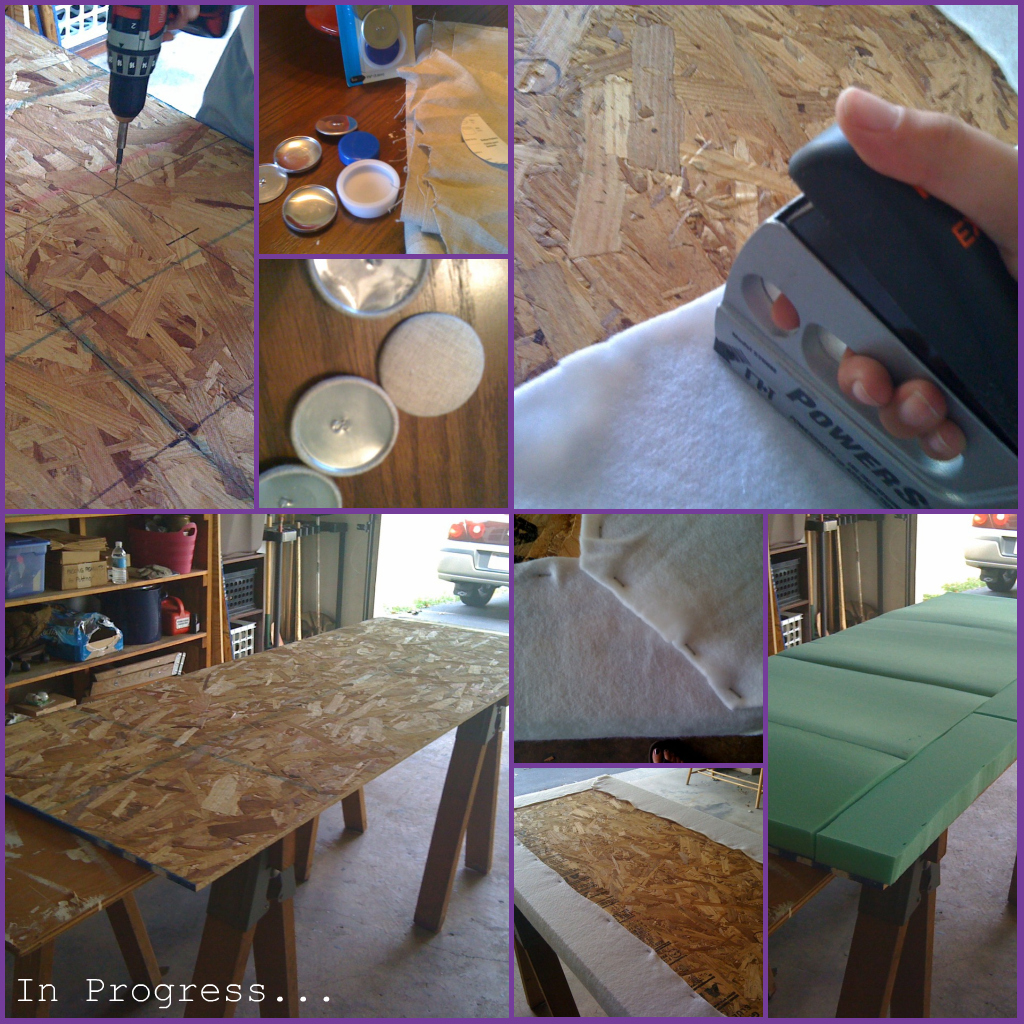
With the help of a 40% off your total order at JoAnn's, a little inspiration, and a few hours of work, we crafted a lovely (if I do say so myself) tufted headboard. We purchased plywood cut to our desired dimensions (75" x 30") by the kind folks at Lowe's, drilled 10 holes into the wood for the buttons, then spray glued the 2" foam, covered it with batting and then the linen fabric, made the buttons, attached them to the headboard, attached 4 hooks onto the back of the board across the top to ensure a secure "hang", and then mounted it onto the wall. 

Here's a little photo collage of the process (iPhone pics), plus a few shots of the finished look:

 
So far, we've slept in our bed without worries of the headboard crashing down on us in the middle of the night, so I'd call it a success!

What do you think? What have you been DIYing lately?

Thursday, September 2, 2010

2010 Project Update

0 comments
With the recent heat wave, and very hot summer, January 2010 seems like decades ago! But as we settle back into our "school year routine", we're taking a look at the projects we'd like to complete this fall, before the snow returns...

Here were our goals for the year:

1. Finish replacing outlets, light switches and cable boxes.  Rob has gotten a lesson on replacing all these things from a good friend of ours who has a background in all things electric, so he got busy starting this project - but every time we think a room is finished, we find another old outlet. We got off to a good start on this, but unfortunately still have some naked outlets... The good news is that all of the VISIBLE ones have been replaced.
2. Refinish dresser for master bedroom.  The dresser we currently have is from Rob's childhood, and his mom painted it teal many years ago to compliment the jungle theme in his bedroom.  A fresh coat of black paint and some new hardware will make this look like it was meant to go with the bed we purchased a few months ago.
3. Remove wallpaper and paint. We're still working out all of the different design elements for the kitchen, as we eventually plan to put in new flooring and countertops, so stay tuned!
4. Sand and paint kitchen cabinets, followed by installing the new hardware we recently purchased at Lowe's over Christmas break on our huge shopping trip. We are still in the planning phases for our kitchen renovation, but have purchased items like a sink and countertops... not we actually just need to get started.
5. Update the look of our front door with paint (red or black? still trying to decide) and new locks and handles... and maybe a new storm door to create a better seal and save us some major mulah on the heating/cooling bill.  We chose red, and are very happy with the result. We installed a new deadbolt, but realized after we removed the old hardware for the actual knob that they don't make that size anymore, so we've been front-door-doorknob-less since, oh, April. :)
6. Linen wall board(s) project, like this one from PB, to help get our organization booties in gear.
7. Refinish daybed - paint and purchase some new, more fitted bedding and tons of throw pillows.
8. Organize basement. This will include sorting stuff that we've been receiving from our parents' storage, deciding what will go toward a yard sale that we hope to have sometime this spring, and figuring out an aesthetically pleasing way to store what we do want to keep - most likely with the help of an Ikea storage system (like this GORM system) that suits our needs. We have partially accomplished this goal. In May, we had a yard sale but our basement could still use a little help...
9. Build workbench to maximize storage in garage, and provide an area for organizing our ever-growing collection of tools and project parts, like this great new cordless drill we got for Christmas. This is on our to-do list for the fall, along with building our compost bin.
10. Landscape, landscape, landscape.  This is Rob's main goal for the year. I think he could probably care less about some of the other projects on our list.  There is one section of our yard that needs to be graded away from our foundation on more of a slope, and we're hoping that will solve the one area of our basement that leaks the least bit.  But we want to get this taken care of so that we can plan how to refinish the basement in future years.  There are also some trees that need to be cut down, branches trimmed, beds redefined, and the list goes on.  So we will be looking forward to spring in a major way this year! Another partially completed goal... we were able to get rid of some trees and do some basic landscaping, but have a long way to go!

As new homeowners (this fall we will celebrate our first year in our home!) we definitely had a lot we wanted to accomplish and were a bit overly-optimistic about all that we thought we could accomplish. We've definitely been learning that all projects take WAY more time (and sometimes more money, resulting in more time) to complete than they look at the outset. 

Stay tuned as we continue to chip away at our list for the year...

Wednesday, August 11, 2010

Be... our.... Guest!

1 comments
Finally. We can finally have friends and family over and give them a comfortable place to rest their head in one cohesive space. It feels like it's been years in the making (even though we moved in to our home a little less than a year ago).

While I can't seem to dig up a before shot right now, when we moved in, the walls and all the trim in the room were pink. For the past nine months, we utilized the space pretty much as a dumping grounds for furniture that didn't fit in any other room, random decor, out-of-season clothes, etc.

Now the most modern room in our house, the furniture is not a random mish-mash, and the curtains and simplicity of the decor provide a really calming space... perfect for our guests!


The four poster bed frame was actually one that we had in our master bedroom, but we've recently inherited a king-size bed, and the black frame worked perfectly in our black and white scheme for the room. The windows face the street out front, and the curtains and sheers really bring not only a soft, luxurious feel to the room, but also bring very practical much-needed privacy. We also moved in the black dresser (the one that used to be teal) and kept the dresser, which was my first furniture painting project before heading off to life in my college apartment, originally given to me by my grandparents for my nursery/bedroom as a baby. It's still going strong! I love the Style&co shams, which somehow perfectly are the same hue as the wall color, which I found in a clearance bin at Macy's a few months back.

What do you think? Any artwork suggestions (I have one little project up my sleeve that I am hoping to complete and share soon)?  Want to come for a visit?

Love,

Friday, June 25, 2010

Wedding Invitations

3 comments
I thought I would share with you a project that I recently finished up for friends of ours who are getting hitched in mid-August.  I was humbled when they asked me to create the invitations to the celebration of their special day! I designed and put together the invitations and all of the other materials like table number cards, menus, and the ceremony program for my own wedding (I'll have to post pictures of those sometime), and really had a lot of fun doing it.  Here's what I finally came up with for Andy & Jessica, after lots of ideas and edits to get it looking just right:


Hopefully this won't bring any crashers out to the wedding ;)  As I was working on them, I fell in love with the simplicity and classicness of the small black border and elegant black knot, which I guess you could interpret as J & A "tying the knot".  What do you think?

Love,

Wednesday, June 9, 2010

More Kitchen Prep

0 comments
It seems like all we ever do is measure the kitchen.  Well, tonight after work, Rob and I are planning to meet at IKEA to actually make some decisions and actually maybe do some ordering for our kitchen. Countertops, sink + faucet, and flooring are on the list.  Plus who knows what else...

Here's a little pre-trip planning, completed in the wee hours of this morning.  Too early for me to be out of bed.  I hope I measured accurately!

You can see a little bit of bleed-through to my "list" complete with prices and measurements on the reverse side.  Like the planning phase, but think I will LOVE the finished phase.  Although I know it will never truly be "finished".  And that's what I love about nesting!

Can you see how this fits into our floor plan?

Stay tuned for some before and "during" pictures - to see what's happened so far behind the elusive plastic curtain I posted a few months ago. 

Love,

Wednesday, May 5, 2010

Furniture Rehab

2 comments
We've been spending our project time lately not only outside, but inside, too - and we've recently completed transforming 2 scratched, worn, chipped, blah, mismatched items of furniture - a dresser and a bookshelf, more accurately - into some pieces that work in our decor scheme and are completely functional for our home.  Check out the boring befores and amazing afters (and one during...)! And as always, click on a collage to view a larger version.

The dresser:


The bookshelf:


What do you think? Here's the breakdown:

+ Both items were cheap or free and were bursting with potential!  The dresser was Rob's (and his brother's) growing up & we purchased the bookcase at Goodwill for just $20!

+ In anticipation of these projects, and others, we invested in a small orbital hand sander which saved us tons of time and will be a great tool to have for future projects.

+ We used the paint we purchased for all the trim in our home to paint the bookshelf (2 coats), purchased a pint of Ralph Lauren paint that was on clearance ($7.94!) at Home Depot in Midnight Black, and used leftover oil-based interior Kilz primer from our kitchen project.

+ We worked on both projects at once, which saved half the work in the prep and clean-up department since we didn't have to prep and clean up for each project like we would have done if we did them at two different times. And to be honest, the rest of our house pretty much turns into a disaster zone when we are doing a project because our attention is focused solely on the project - so that saved 1 extra instance of home insanity as well!

What projects have you taken on lately?  Any projects in the works since it's yard sale season, and you found something up-cyclable?

Monday, April 5, 2010

Project Fever

0 comments
Over the super cold and snowy winter months, we took a hiatus from project-ing.  Large project-ing, that is.  But now that the weather has turned warmer and we can open the windows to air things out, our renovations are back in full swing... and things that we have been wanted to start doing for months can finally get started!

And our house is a mess.  But it will be worth it eventually.  Probably a long eventually, but eventually nonetheless.

Today, the archway between our living room and kitchen looks something like this...


Can't wait to see what's happening behind the curtain (seems a little bit Wizard-of-Ozish)...?

Check back soon to see what we've been up to.  And why we find dust smudges on our clothes when we get to work.

Monday, March 29, 2010

March Update

0 comments
March is almost over, and I have been a lousy blogger this month.  I think the beginning of Spring has gotten me re-energized to start new projects, and we have definitely been spending more time working on things outside, and later into the night since it stays lighter outside for so much longer.  All of this has meant less time to blog.

Or maybe that's just my excuse.

Kitchen Update: All the wallpaper is finally down, and Rob has spent countless hours scraping glue remnants and sanding in preparation to paint.  We have also spent lots of time planning how to use our tax rebate money to change as many things as possible, and have found some great deals so far, like under-cabinet mounted lighting for $5.99 at Ollie's (usually cost $14.99 each at Lowe's).  We have also decided on butcher-block countertop from IKEA, and a dishwasher with the utensil holder on the door... Rob's choice... making room for more dishes in the bottom drawer so we don't have to run the dishwasher as often.  I am trying to find a white farmhouse-style sink that I like and that fits the dimensions that we need.  The plan is to get a lot of this done while we won't be living at home for a month - that's right! back to camp for us this summer - which will be nice, since I won't be needing to cook then, and might actually be able to enjoy the renovation more.

Bathroom update: The pink toilet has been running constantly.  It used to stop running if you jiggled the handle, but that stopped doing the trick about two weeks ago.  We knew we would need to replace the toilet eventually, but we were hoping to wait until next year at this time to work on projects in the master bathroom.  On the upside, we're getting more money back for our tax return than we anticipated, and we also have a friend who is going to help us with another bathroom project prior to replacing the toilet - installing a tile floor!

In other update news, we've been able to do small projects, like get the front door prepped for painting it red later this week, hanging some more artwork (especially in our master bedroom), and hanging a coat rack/assembling a shoe bench so that we have some semblance of a mini mud room near our front door.  Rob has also replaced a few more outlets, and installed the new wireless doorbell.  Oh, and we're also brand new premium members of AAA, because we drive cars that are getting up there in age and you never know when you'll need a friendly tow. 

I officially feel like a grown-up now - I have purchased my first toilet, and have joined AAA without my parents paying the membership for me. 

Wednesday, March 10, 2010

Bye, Bye Wheat!

1 comments
The time has finally come.  Something yesterday in me triggered the reality that I could not bear to look at the wheat wallpaper that has so lovingly adorned our home's kitchen walls for years...er...decades...any longer.  It just had to come down.  Surely what was behind it couldn't be any worse!?

There it is.  The lovely wheat pattern up close.  Can you see the texture?

So last night on my way home from work - after doing a little research about the removal process and what supplies I would need - I picked up some wallpaper removing supplies (after a brief stop at IKEA, of course).  My parents recently moved, and found a half used bottle of DIF Wallpaper Stripper Gel Solution, so I just had to purchase a scorer (a small round tool that creates perforations in your wallpaper without damaging the walls so that the solution can get through to the glue), an empty spray bottle so that I wouldn't have to roll on the solution, and a paper scraper (fun to say!).  Oh, and an industrial-size sponge for wiping down the walls as a final step in the process.

The four-step simple removal process goes like this:
1. Start in an inconspicuous location (I did behind a door) by scoring a small section of the wall.  The more you score, the more the solution will soak through the paper and loosen the glue, and the less you will have to scrape.
2. Then, simply spray the scored area and let it soak into the wallpaper for 2-10 minutes.  I waited about five on the first try.
3. Then, using the scraper, start at an edge and begin to slowly loosed the paper until you have a section of paper where you can get your scraper under - then scrape away!
4. Finally, wipe the walls with warm water to remove any remaining residue or solution.

Easy, right?

Well, let's just say I am glad I used my fingers first before opening the scraper which I will be able to return.  As soon as I got to step three and peeled a section, I realized that the whole thing was just peeling right off!
The glue probably weakened over the last century.  ;)  Soon, my kitchen was looking more like this:
Whole sections, from floor to ceiling, ripped right off the wall! I've never gotten such huge results with so little effort in my life. Another plus is that I can save some money by returning the paper scraper!

Anyone want me to send them a piece?  I am sensing some gag-gifts coming on...
(Note to self: wheat wallpaper + hideous vinyl flooring = EW!)

And this is what Rob came home to...
We're almost ready to paint again! Stay tuned for more kitchen reno...

Oh - and here's another shout-out to my iPhone, which came in handy when I realized my camera's battery was dead and I was having way too much fun to wait for it to charge before I continued!

Thursday, February 4, 2010

Snow Day Planning

1 comments
It kind of sounds like an oxymoron to plan ahead for a snow day.  And I don't mean the run out to the store and buy eggs, break and milk kind of planning.  But I figure if we're going to be stuck inside Friday night and all day Saturday, I might as well put it to good use.  Here's what I've got planned... working on some of my year's to do list and working on some other projects I've been "collecting":
  • Finish second linen wall board project (made first one a few weeks ago, but still have supplies sitting around for the second).
  • Get to the bottom of the laundry pile.  This is on my list EVERY week it seems, but somehow, it's a bottomless shopping cart pit.
  • FILE! And not the taxes (thanks to 2 accountants in the family, I won't have to use the TurboTax this year).  We have so many bills and tons of paperwork that hasn't made it out of the bill box into our filing cabinet yet.
  • Felt craft art project using some materials I found recently in the $1 section at Michael's.  Pictures to follow this project, of course. 
  • Get Rob to finish re-installing all of the outlets so we can cross that off of our list.  Not many to go!  
Other than these projects, we will probably build a fire and watch some movies. And maybe I will try a new PW recipe from my cookbook.  Any snow weekend plans for you?

Wednesday, February 3, 2010

Chocolate Wrapper Art

0 comments
For under $6 and less than 10 minutes, I was able to create some artwork more than appropriate for the kitchen.  And I got to eat some antioxidizing chocolate before I started.  Well, actually, I ate it a week ago, and the chocolate was a gift, which was even better.
(click on the image to see the collage in BIG view)

And the finished project, nicely displayed on my kitchen counter for all to see (and I have to say how glad I am that it takes attention away from the peach countertops that I've mentioned in the past)...
Gotta love the vintage modern art, inspired by something so simple.  Sometimes decorating and accessorizing is just about working with what you already have (or in my case - HAD - after I polished off my yummy treat... not in one sitting of course!).  

Friday, January 29, 2010

A New Use for Used... Socks?

1 comments
Last night we finally dismantled our Christmas tree.  Yes, on January 27.  Even after Rob suggested leaving it up until next year and I actually considered it.  So we found all of our "empties" in the basement, brought in our after-Christmas steals (mostly from Target), and re-organized our Christmas decorating stash while un-decorating the tree.

That's when I realized I had thrown away some of the plastic containers that some of our ornaments came packaged in originally.  I couldn't just throw the ornaments in among all of the other decorations.

And then it hit me! like a 2x4 - although, really... I don't know what that feels like.  I remembered that Rob recently emptied out his drawer-full-o-socks so that we could downsize our drawer space (in preparation for living with less dressers) and purchase only the same brand and type of socks, thus mostly eliminating the case of the solo sock that's partner can never be found.
I can read your mind.  I know that you're thinking "GROSS! Who in their right mind posts a picture of nasty old socks?!?"  Remember... this is the Normally-Odd Couple.  :)

Old socks make great ornament holders.  You just cut a sock in half (well, if your husband wears a size 13 shoe, that is).
Then insert an ornament like so (I leave the hangers on for ease the next year)...
And VOILA! A soft, protective barrier is placed between one ornament and another.  Then, I just carefully placed ornaments of like style in freezer ziploc bags.
Instant, safe, and recycled storage for years to come!  Used socks are more useful than one would think.  Does anyone still have their Christmas decorations up?  (Come on, Katie... who are you kidding!?)

Oh - and here's a little shout-out for the help from my sister-in-law Lindsey... thanks a million!

Friday, January 22, 2010

Vanity Tray

1 comments
The last time I visited one of my favorite craft stores, JoAnn Fabrics, I kind of got a little carried away with some of the home decor fabrics... so bought small amounts of a few different selections (it was a difficult choice!) to do a few small projects with.  One project was to add a little interest to a side table.  Another was to turn a Kohl's clearance picture frame into a vanity tray for my dresser that I could use for tossing my jewelry on at the end of the day.  $6 picture frame + a $1 snippet of fabric = well, take a look for yourself...

This could easily be used as wall are, too, but for now it will keep its place as my new vanity tray!

Friday, January 15, 2010

A Little Bit Goes a Long Way...

4 comments
Well, this past week, we have been working on small projects around the house. It is amazing how such little improvements make such a major change in a room!  Take, for example, the outlets and light switches.  Every switch and outlet in the house was this ugly brownish-black, and the outlets were only two-pronged, so we needed to install new outlets that were grounded (making them safe and up to code!) but also consistent in color throughout the house.  We opted for white. 

We opted for white. Such a difference!

Another small project I accomplished was adding a little pizazz to this white nightstand, which used to be the TV stand in my first apartment.  

For this project, I started by finding some fabric (home decor fabric, to be more specific - so it's a little heavier than, say, quilting fabric) that would work as a nice accent color in this room (our guest bedroom - still in the making).  I bought a piece of posterboard at the fabric store, and cut it to the size of the glass.  Then, I ironed my fabric, and used some Fabri-Tac fabric glue - which is fabritastic! - to carefully and tightly wrap it around the back (pretty much like a package) and glue it in place.  This glue is mess-free and creates a quick bond.  I would recommend it in place of a hot glue gun anytime you need a thin but strong bond, don't want to sew, and are working with fabrics. I started in the middle of each side, working my way to the corners and finishing the corners last with a nice, tight fold & glue. Once it was dry, I simply placed it between the nightstand and the glass.  Easy as pie!

A close-up of the patterned "designer" fabric I purchased for only $9.99 per yard at my local JoAnn's.

And last, but certainly not least, I wanted to share the story of the date fund jar - an easy DIY project using a jar from IKEA, some magazine clippings, and the wonderfulness of mod podge - pictured below.  I made this as a Christmas present for Rob back in December 2004, and we've been using it as a cash/coin collection jar ever since.  Do we always use the money for a date? No... but at least we can see our pocket change add up in the end.  Over Christmas break, we took the jar to our local TD Bank (formerly Commerce Bank), which has the Penny Arcade - a fee-free coin counting machine.  We saved up $166.58! And we're going to make it a yearly competition now that we're married to empty it just after Christmas each year to see how much we've saved, and if we've outdone the year before.  You can see our jar already has some $$$ for 2010! 
Does anyone else out there save up their change?  What do you use it on?

you might also enjoy...